Tuesday, December 22, 2009

This is what I want to look like!

This couple was found wandering the De Young Museum in SF. My friend took their picture and sent it to me because she knew I would enjoy seeing people so joyously dressed. And she was soooo right!
This couple really embody the idea of clothing as artistic expression! I am moved and inspired by this couple and hope you are too. And, yet, don't wait for your golden years to enjoy being an eccentric, you could start today....

Tuesday, December 15, 2009

The Leftover Dress


This is just a little draping brainstorm that has yet to be created. The idea behind this is that it would be the dress which is all the leftovers and mistakes of the "Varda's Women" gown collection. This dress ideally would be worn at my 'official' fashion-show runway event of the collection.

To see where the scraps came from...or in other words to see the "Varda's Women" collection click here


Tuesday, December 8, 2009

A Pineapple a Day

Sometimes we get sick of dressing humans and we decide we must start decorating our much ignored friends...fruit!

I decided to decorate a pineapple for a friend as an edible gift. It was a fun and eco way of using the present as the wrapping :-)))

From a design standpoint I must admit that pineapples are one of the most interesting fruits out there. I just adore the shape of the oval body juxtaposed to the jutting plumage of the stem. If I were to design clothing inspired by edibles, a pineapple would one of the first...followed next by a star fruit, then perhaps by deformed lemons!

In many ways this posting is much more of a Martha Stewart moment, but sometimes we must seek inspiration outside of our normal boundaries and seek it in prickly objects!

Monday, November 16, 2009

Underbelly Inspiration


Today I am displaying another example of unintentional beauty. The design of different colored threads are the backside of a new type of vest-like garment I am experimenting with. I like how the hand stitches create a simple, almost childlike expression on the back of this fabric.

The front side is very complex and busy, so it is a nice juxtaposition to think about what is created below the busyness!

Here is a pic of what the front-sid
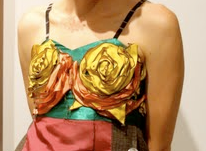
e texture is like. Although the pic here isn't actually the finished garment of the piece that is pictured above. But almost.....

Tuesday, November 3, 2009

Collage, Collage, Collage


Besides creating clothing, collage is probably my next favorite artistic medium. In many ways I approach clothing design much like making a collage....except that it must be made of materials that you want to put on the body. This creates fun constraints--for me! However,in the end the freedom allowed in collage is very rejuvenating.

A little side note about me is that I almost never--might I dare say NEVER---buy greeting cards. I have almost always made them myself, and use birthday, holiday greetings as a great excuse to get to collaging.

Therefore, I thought I would post one of my most recent letters. This one was made for the artist Nick Cave (one of my personal heroes) and I decided to finally write him to tell him how much I appreciate what he brings to the world.


Pictured here is the front and back of the card. I ended up writing on it, but I photographed it in its pure form.

I also had a great deal of fun creating the envelope. I used a pair of denim pants as the container and I used my sewing machine to embroider the addresses. It was a bit tedious, but I really like the result. For the name "Nick Cave" I used a freestyle sewing foot which allowed me to create the name in a more organic form, in comparison to the the programed address part.

If you like what you see click HERE to see other collages by me.

Tuesday, October 20, 2009

Inspiration in Texture and Color

I thought I would share some images I took from one of the projects I am working on. Every so often--or perhaps more often than I admit-- I get inspiration from a garment as it evolves. Or in other words, in the act of creating a garment, the garment itself takes on its own surprising identity. That is, you really never know how something will be until it "is". And often, it "is" very different than imagined, and often even better than originally designed.

If you haven't gotten the gist yet, I like to philosophize about the creation process!!!

Anyway, back to the images at hand. The first image is a picture of a an acordian sleeve of a mini bolero jacket. The fabric is hand dyed silk by Ana Lisa Hedstrom and it is backed by a blue metallic silk organza. As I sewing it I was so taken by the inside of the jacket that I had to take a photo. I love how the organza adds a hue and a stiffness to the silk below and gives it a painterly feel when seen up-close.

The second pic is a pile of seam allowances that were trimmed from the same jacket, and I love how all the colors blend together in this little pile.

Friday, October 2, 2009

The Latest Blazer Vests Cont....


As usual I am posting one of the next vests to be created, plus an awkward photo of me wearing it. It is hard to take a good photo of yourself without any help!

Tuesday, September 1, 2009

New Vagadu Labels

Been away for a while because I was working on my Aug. 30th deadline for the photoshoot for the "Varda's Women" fall gown collection. The last two weeks have been really intense working at least 10-12 hour days to get the dresses ready! But now that it happened and went well (photos to come soon) I am working on the little details for the dresses.One of these details being the all-important LABEL!!!!


I mean, without a label who are you?
So, I got crafty and came up with an idea for the next series of Vagadu tags. I may have mentioned this before but I love working with the heat press and doing dye transfer with it. The heat press is often used for T-shirts, but Ana Lisa Hedstrom and I have been playing with this machine using shibori techniques for months now and having some real fun!


I needed a Vagadu stencil so the easiest solution was to use one of my hangtags that have the Vagadu stamp on it (these tags are great because they are made of a nice heavy duty stock) and use an exacto knifee to cut the letters out of it.


Then, I used it a bizzilion ways on my fabric (which once was a little girl's bridal dress). You can see in the pic how much fun I had. And, so the next step will be to cut the individual labes out and seal the edges ..... although if I were a label-whore I might have to make these Vagadu fabrics into a bag or hotpants ;-)))) !!!!

Thursday, August 13, 2009

The Latest Blazer Vests


Here are two more of the ever-so-popular blazer vests.

This time I am modeling them on the roof of my studio...it was a bit breezy and sunny so I am squinting a lot, but other than that you can see that these vests are totally fun to wear.

The tan vest I got a tad 'western' on it and added fringe (which seems to be the craze right now). For me, the fringe was a fun departure from the usual look of these cuties.

As usual they are both for sale so if you are interested email me to set up a fitting!


Bookmark and Share

Monday, August 3, 2009

Work in Progress...


As you know I love reworking garments that need a little "pick-me-up" or a special something to take it out from being just good, and turn it into great or interesting!

The example I have for this week is a vest that I have been working on for a friend of mine. It has been a challenge of a piece because we didn't want to change any of the outer structure of the garment. Except for removing the puffy collar as seen to the right. The reason we removed it was it was a dirty white, but the kind of dirty that instead of looking like a color choice, it just looked ....dirty. And, although in concept the puffy collar with a puffy fashion vest would seem like a fun design element, in practice it just doesn't do it for me. I think the reason I don't like it is that it is too much softness on an already soft piece, it doesn't add needed contrast or interest. For me, having a different texture or structure to butt up against the dominating element--is key. For example: lace with denim, leather with silk, corduroy and satin, etc.

So, below are a series of shots I took with my favorite embellishments and applique options for the piece. I haven't decided which one is the favorite, depending on feedback from the community I will make a choice. Feel free to drop a line and say which version you like! I am partial to flowers, but lace is good too!

P.S. The applique flowers have several arrangement options, so you can see which version of the is most appealing


Bookmark and Share

Thursday, July 23, 2009

IQ tops....the latest versions!


I have decided to name the Ana Lisa Hedstrom silk crepe scrap blouses "IQ tops" because these garments are like the Rubik's cube for fashion. The combination's of how to wear them are countless the depending on the creative the mind of the wearer. One of the reasons this is true is silk crepe has the best drape of almost any fabric and practically any way it hangs looks good.

Another bonus in showing off the latest of the tops is that you can see my latest haircut which I call "boyband meets Joui!" Go and look up young Justin Timberlake and you will see what I mean. And my boyfriend mentioned that we both have the acronym JT!!!

*Note* each strip of photos represent one blouse...yes it is true just one blouse! It is my way of showing you the tip of the iceberg of the 1,000 ways to wear these tops! And YES! they are for sale, email me if interested.

Click on images to enlarge


Bookmark and Share

Wednesday, July 8, 2009

Easy Shoulder-Strap Closing Technique (for lined garments)

My dear friend Lauren showed me this strap technique. It is hard to explain yet I think is so important to know that we decided to create a pictured online reference for all the fanatic sewers out there to utilize. In fact, having this useful posting will be a great resource to send my colleagues every time I try to poorly explain the technique, they can just look to this! YAY!


Step 1
Make sure your strap's seams are open about 3 inches on either side. The lining (as seen in black) shoulder seam is connected while the fashion fabric (in yellow) remains open.


Step 2
Sew the shoulder closed of the fashion fabric (yellow) . As you can see in the picture to the right, she is holding the yellow fabric together to indicate the need to sew it closed.


Step 2a
You can see how the top strap is being sewn closed.


Step 3
As pictured here you see the recently sewn shoulder seam. The next move is tricky and is better explained with pictures.

The goal is to sew one of the side shoulder strap seams by moving it through the opposite strap opening which allows you to sew with the right sides together.


3a
In the picture to the right you can see the fabric being pinched and getting ready to be pulled through the other side.


3b
In this picture you see the fabric being being
pulled through to the other side and
ready to be sewn.


3c
As pictured the side seam is being held
flat so you can see where you will sew.


Step 4
Pull the fabric back through so you can admire
your first nicely sewn side strap seam.


Step 5
Pull the strap through the opening in the bottom
of the lining. Your hand is coming in from below and pulling the strap down so it comes out the bottom.


Here is another picture of the strap coming out of the bottom opening of the lining.


Step 4
Sew the last remaining side strap opening.
Be sure that it is clear from any bulk from
the other seams before you sew. Once it is flat, line up your seams and sew.


Step 5
Pull the strap back through the lining to its proper place.

There it is! You have a lovely strap!


Bookmark and Share